This post may contain affiliate links. For more information, see our privacy policy.
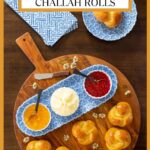
With an egg-enriched dough similar to brioche, these fabulous No-Knead Challah Rolls are soft and fluffy with a golden, honey-glazed exterior. The slightly sweet dough comes together easily without a mixer!
I made a double batch of these delicious No-Knead Challah Rolls yesterday for a family get-together later today. We're serving pulled pork (a new recipe coming up!), mac cheese (my daughter-in-law, Linday's specialty) and a big Caesar salad with our Seriously Delicious Ridiculously Easy Caesar dressing. We'll tuck the pork into these yummy rolls and serve an herby avocado spread on the side. I'm getting hungry now, thinking about it!

Make plenty!
We have a good-sized family, 12 of us, including kids and grandkids, but these days, there always seem to be a few extra with boyfriends (football and basketball athletes with BIG appetites) and friends that are invited along the way. So I've learned to be prepared, especially in the bread category, as there have been a few times in the past that I didn't make enough. You should have seen the SAD faces around the table! That's why, even though this recipe makes 20 nice size sandwich rolls, I decided to save my neck and be safe by doubling the recipe.

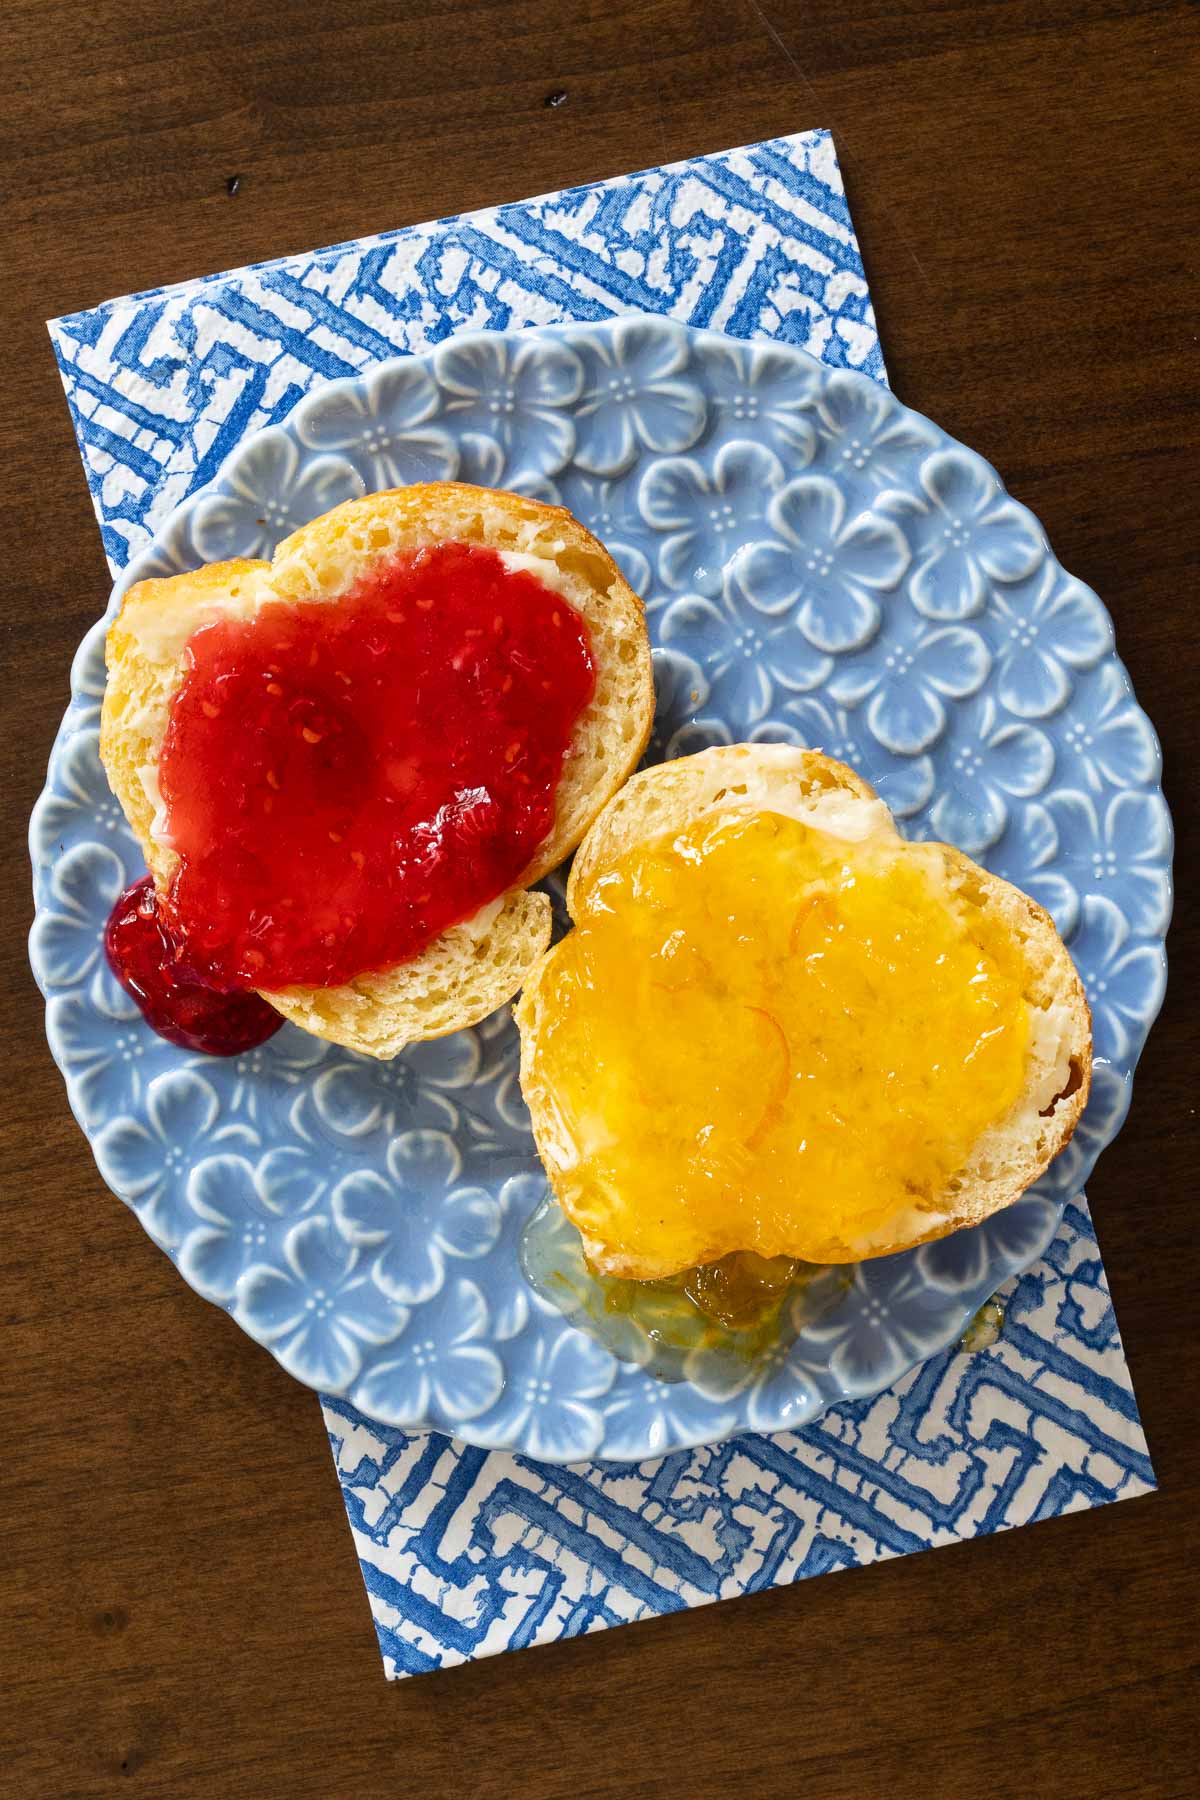
These No-Knead Challah Rolls have been a big hit with everyone who tries them. The crumb is soft, tender and moist with a crisp, golden glaze has a drizzle of honey for a hint of sweetness. Use them for dinner rolls, sandwiches, breakfast rolls... anytime rolls! People (me included) lose their minds over these rolls served warm with butter and jam, as shown in the pictures in this post. We love to pair them with our Raspberry Freezer Jam and/or our Pineapple Mandarin Marmalade
What are Challah Rolls?
Challah Rolls are miniature versions of Challah bread a beloved Jewish bread commonly served on Shabat and other special celebrations and feasts. Challah is typically a pillowy soft, shiny-glazed, braided bread enriched with eggs and honey. Similar in taste and texture to brioche, challah is unique in that it generally does not include dairy products, like milk or butter. Brioche, on the other hand, typically has lots of butter and milk is often included in the ingredient list.
While I'm generally a huge butter fan, when it comes to baking, these No-Knead Challah Rolls are so delicious I don't miss it! I don't think you will either!

No need to knead
If you look at most Challah bread recipes, you'll find that instructions to vigorously knead the dough anywhere from five to ten minutes. Why? Kneading helps develop structure while also incorporating air into the dough, which helps it rise nicely.
So how does that work with these NO-KNEAD Challah Rolls? Magic! It's a magical technique called "Stretch and Fold" which requires minimal time but gives the same beautiful results as a long, vigorous knead does.
The stretch and fold technique does require you to be hanging out at home for a few hours but the work involved is less than a minute with each go round. They say "A picture is worth a thousand words", I think a demonstration is even better. That's why I asked my daughter-in-law, Lindsay to create a video, demonstrating this easy, magic trick. Check it out:
You'll perform this little stretch and fold 4 times during the rising period. With each stretch and fold you'll see the dough progress from a shaggy mess to a beautiful, satiny dough. Call me lazy, but I love this no-knead technique!
That shiny glaze...
I've been trying to figure out for years how to get that gorgeous, shiny exterior that you find on brioche and challah rolls from good bakeries. I tried lots of different suggestions... egg mixed with water, egg white, egg yolk, milk, cream, honey... Each one produced okay results but never that really beautiful shine.
Recently I read in a forum that they way to achieve that coveted shine was a double egg wash, once before baking and another midway through baking. I tried that with my first batch of these No-Knead Challah Rolls and was delighted when I pulled them from the oven with a golden shiny glazed that was pretty as a picture. You CAN teach old dogs new tricks!!

How to shape these No-Knead Challah Rolls
If you google, Challah bread, you'll see a zillion ways that it can be shaped, mostly fancy braided techniques. There are lots of articles and videos demonstrating these complicated but beautiful braids. I like things to be visually appealing but strive for simple and doable. That's why I chose an easy little knot for my Challah rolls.
Scott took a few pictures to demonstrate this simple little shaping method:

Start by portioning your dough. You can either eyeball it or use a scale to get equal-sized rolls. I like to make my sandwich rolls about 2 ounces (60g) and my dinner rolls a little smaller, right around 1½ ounces (45g).

The next step is to roll each portion into a long round strand. You can do this between your hands or roll them out on a work surface, starting in the center and working your way to the edges.
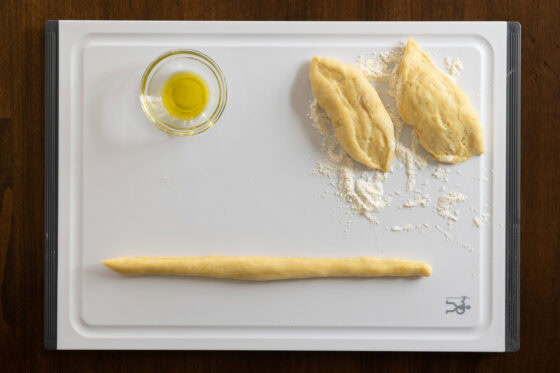
You want each strand to be around 7-8 inches. Don't worry if the strands don't look perfect and are fatter or narrower in places. It will look fine after rising.

Pick up one strand and make a simple loop, crossing the dough over itself.

Bring the end that's underneath up and over the dough.

Tuck that end into the hole in the center of the loop.

Now, tuck the other end under the knot you've just formed.

Turn the knot upside down and pinch the two ends together. You don't want them to come apart during the last rise or in the oven so give them a good, tight pinch.
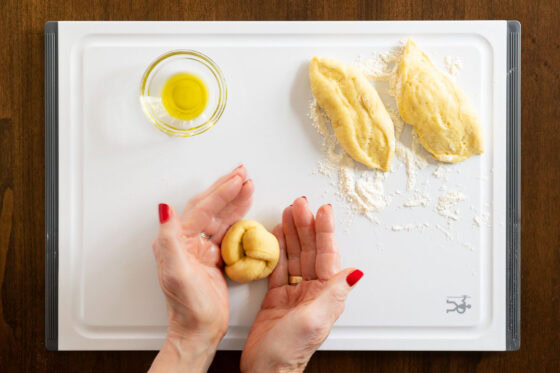
Lastly, turn the knot back over and cup it with your hands to form a nice shape. That's it! Line up your little knots on a parchment-lined sheet pan for the final rise.
One other super easy option is to roll the strands in a coil and tuck the end underneath, again pinching the ends together.
Let's get baking!
Okay, now that you know all the little tricks (above) and tips (below), it's time to start baking. And when your family or guests peek into the bread basket they'll be lots of oohs and aahs. When they take the first delicious bite, expect LOTS of eye-rolling and rave reviews!

Cafe Tips for making these No-Knead Challah Rolls
- Yeast dough likes a warm, cozy place to hang out. If your house is chilly, there are a few things you can do to create a nice warm yeast-friendly place.
- If you have a warming drawer, set the temperature at 80-85˚F. It makes a happy home for dough.
- Turn your oven to 350˚F for 2 minutes then turn the oven off. Leave the light on and place your dough in the oven.
- Vigorously boil a cup of water in the microwave for 4-5 minutes. This will create a lot of nice, warm steam. Place your dough in the microwave and close the door.
- Set the bowl in the sink in a larger bowl of hot water.
- If you have a load of laundry drying, set the covered bowl on top of the dryer. Make sure you have it on a towel, or it might "wander" off the top of your dryer - that would be really sad!
- Place the bowl on a heating pad.
- This recipe calls for bread flour or all-purpose flour. I like to use bread flour as it has a higher protein content which makes the dough a little more stable and yields a slightly higher rise. That being said, I've also used all-purpose flour for these rolls with good success.
- This dough is thick. I like to use a heavy-duty spatula with a wooden handle to mix it up.
- Can you use an electric mixer for this recipe? Yes, of course you can. I prefer not having to pull out my mixer, but if you have any issues stirring up a thick dough, by all means, use your mixer!
- If you find the bottoms of your challah rolls getting too dark, you may need to set an oven rack one level higher. Another option is to use a second sheet pan underneath the top parchment-lined pan.
- Challah bread often has a sprinkle of sesame or poppy seeds. Feel free to add either or both of these after the second egg wash, if desired.
- Don't be afraid to generously flour your work surface when shaping these rolls. For years, I had trouble making bread and would get so frustrated because the dough would stick to the counter or my hands and everything would be a big mess. I finally learned that I just wasn't using enough flour. Don't overdo the flour, but use enough so that the dough isn't sticky.
- A dough scraper is a super handy tool to have when working with yeast doughs. It's great for scraping the counter and also works well to transfer the dough from one place to another.
- You need instant yeast for this recipe. Instant yeast is available at most grocery stores. It's sometimes called rapid-rise yeast, quick-rise yeast or bread machine yeast. I like to buy my instant yeast in bulk as it's infinitely cheaper than purchasing the little packets. It will keep for months in the refrigerator and indefinitely in the freezer. I keep a small jar in the refrigerator at all times and the rest in the freezer. I refill my little jar as needed.
- Last, but NOT LEAST, don't forget the yeast!! A while back I put together a batch of dough for rolls. I went about my business for the next hour and when I returned to the kitchen, expecting to see a bowl of beautifully risen dough, I was shocked! It looked exactly like when I had left it. "YIKES", I thought to myself, "you forgot the yeast!". Luckily, instant yeast is very forgiving. I sprinkled the amount called for over the dough and spent a minute or two working it in with my spatula. After another hour, I was surprised to find my dough happy and high in the bowl!
- You'll find that you'll have 3 egg whites remaining after making this recipe. Use them for a high protein breakfast or a cake like this delicious Pink Velvet Cake. You can also freeze egg whites until you need them.
- These Challah rolls freeze well!
Thought for the day:
Lift up your eyes on high
And see who has created these stars,
The One who leads forth their host by number,
He calls them all by name;
Because of the greatness of His might and the strength of His power,
Not one of them is missing.
Isaiah 40:26
What we're listening to for inspiration:

If you enjoy this recipe, please come back and leave a star rating and review! It's so helpful to other readers to hear your results, adaptations and ideas for variations.
Scroll Down for the Recipe - or Save It to Your Inbox
We'll email you the recipe so it's easy to save, print, or share.

No-Knead Challah Rolls
Ingredients
For the dough:
- 4 cups bread flour
- 2 ¼ teaspoons instant yeast
- 2 teaspoons kosher salt
- 2 large eggs
- 1 large egg yolk
- ⅓ cup extra virgin olive oil
- ¼ cup honey
- 1 cup warm tap water, divided
For the egg wash:
- 2 egg yolks
- 2 teaspoons honey
- 1 tablespoon water
- ⅛ teaspoon kosher salt
Instructions
For the prep:
- Line two sheet pans with parchment paper. Set aside.
For the dough:
- Combine the flour, yeast and salt in a large bowl.
- Whisk together the eggs, egg yolk, olive oil and honey in a medium-size bowl. Add ¾ cup of the hot tap water and stir to combine. Reserve the remaining water.
- Make a well in the center of the dry flour mixture. Add the egg mixture stir with a spatula until well combined and no dry flour pockets remain. The dough will be sticky. If your dough seems dry, add a little more water, a few teaspoons at a time until, the dough comes together. (I often need one tablespoon extra. You may need more or less, depending on your flour.)
- Scrape any dough off the edges of the bowl then drizzle the ball of dough lightly with olive oil. Use your spatula to rub the oil to coat the surface.
- Cover the bowl tightly with plastic wrap and set in a warm place for 30 minutes. (See the Café Tips in the post for suggestions on how to create a warm spot for the dough.)
- Remove the plastic wrap.
- With a wet hand, grab an edge of the dough, stretch it up, then fold it across to the other side. Turn the bowl a quarter turn and repeat. Repeat this stretch and fold 2-3 more times. (See a video in the post that demonstrates this stretch and fold technique.)
- Cover the bowl again with the plastic wrap and return it to a warm place. Repeat the stretch and fold 3 times at 30 minute intervals.
- Transfer the dough to a well-floured work surface. Divide the dough into equal portions. For sandwich rolls, I make each one about 2 ounces (60g). For dinner rolls, I go a little smaller, 1½ ounces (45g).
- Roll each portion into a 7-8 inch strand. You can use your hands to roll the strands are roll them on an unfloured area of your work surface.
- Form a simple knot by making a loop with one of the strands. Tuck the end that is underneath and down into the center of the loop. (See pictures above in the post.)
- Tuck the other end under the knot and pinch the ends together underneath. Cup the knot a bit with your hands to form a nice circle. Transfer to the prepared sheet pan. Repeat with remaining portions, spacing the knots about 2 inches apart, using both sheet pans.
- Cover the sheet pans with a clean kitchen towel and allow the knots to rise until almost double in size, 30-45 minutes, depending on how warm the area is.
- Towards the end of the baking time, preheat the oven to 350˚F.
For the egg wash:
- Combine the egg yolks, honey and water in a small glass or bowl. Whisk until well combined.
- Brush each challah knot on the first pan with the egg wash, trying to keep the wash from dripping onto the parchment.
- Bake for 8 minutes, then remove from the oven and brush the rolls one more time with the egg wash.
- Return to the oven and bake another16-19 minutes or until the rolls are a deep golden brown.
- Remove the rolls from the oven and transfer with a spatula to a cooling rack.
- Repeat the egg wash and baking with the second pan of rolls.
- When the rolls are room temperature, they can be stored in an airtight storage container until ready to use. They can also be frozen. Thaw and warm before serving.
Notes
Nutrition
Shop Our Café Loves
We’ve gathered our favorite kitchen tools, tableware, and entertaining treasures in one place, the Café Loves store. It’s a wonderful spot to find something special for yourself or the cooks and hosts you love!


Can you make ahead and refrigerate? I’m hosting Thanksgiving for 19 this year and want to make homemade rolls and these sound so delicious.
Hi Julie, these freeze really well. You can make them ahead, freeze and then warm them before serving. Enjoy!
Please tell the temperature you set your oven to bake the rolls. I did not see it. I can't wait to try the recipe, they look so good.
Hi Vickie, it’s 350, it’s in the last step under “for the dough. Hope you enjoy these rolls!
thanks for stretch and fold video
Glad it was helpful, Rosemary!
cant find video for stretching dough
Hi Rosemary, I did post the video but if you have ad blockers, it won't show up as there are ads in the video.
Did you post the video? Can't wait to try this recipe.
Hi Robin, Hope you enjoy the Challah rolls!
I did post the video but if you have ad blockers, it won't show up as there are ads in the video.
Chris, you tease, you! These look amazing. Can't wait to try them. You teased us with the mention of the herby avocado spread! Is that a recipe that is forthcoming? I would love to have it. We love all of your recipes and know that when I use one, it will turn out absolutely perfect. My son and I were talking about how some food bloggers don't even respond to comments or emails they receive with questions. He brought up your name and said she's so busy and traveling all over the world and she still finds time to respond, so why can't others do it? So believe me when I tell you, you're a trusted name in this household, not only for your fabulous recipes, but for your care about your fans. Thanks for all you do
Aww, thanks so much, Kat! I really appreciate your kind encouragement. I love interacting with our readers!
I hadn't thought of sharing the herby avocado spread but that's a great idea!