
This post may contain affiliate links. For more information, see our privacy policy.
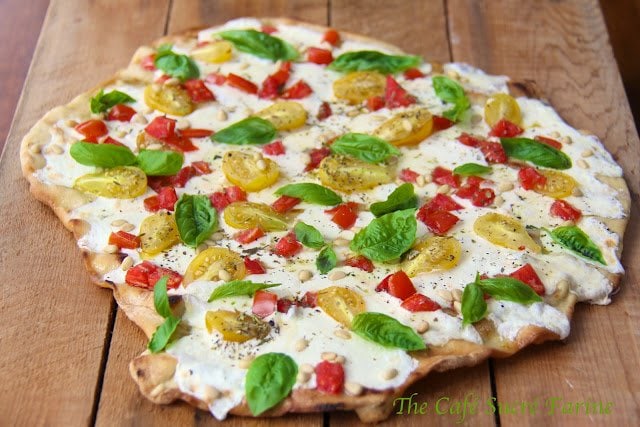
Grilled Pizza Margherita - with a shatteringly crisp, super thin crust this simple pizza is always a winner!
When my husband walked in from the garden proudly displaying a bowlful of these beautiful tomatoes, I knew exactly what we'd be having for lunch!

They were our first heirloom tomatoes and I was like a kid in a candy shop! An idea for a Pizza Margherita was swirling around in my head, utilizing these beautiful freshly picked tomatoes and a ball of fresh mozzarella I had in the fridge. And since we're trying to cut back a bit on carbs these days, a grilled pizza with a cracker-thin, super crisp crust sounded perfect.
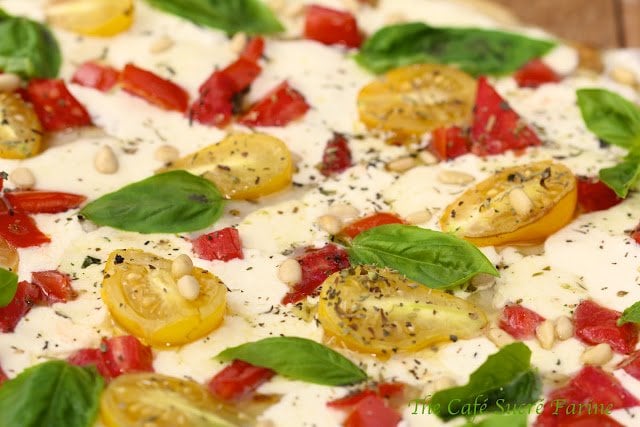
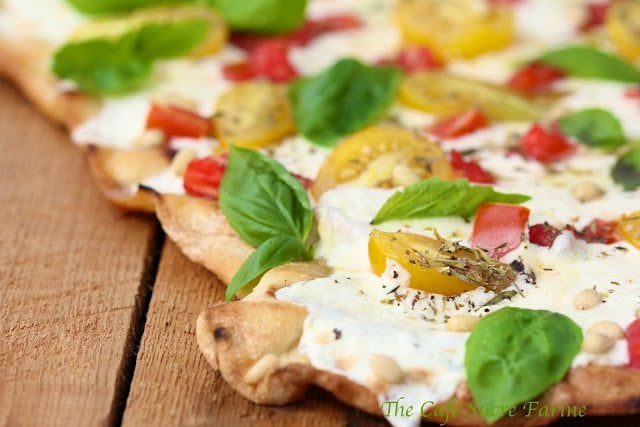
The results are beautiful and who would think that something with such simple ingredients could be so mouthwateringly delicious?! The base for the pizza is an layer of extra virgin olive oil, then fresh mozzarella followed by tomatoes, pine nuts, Italian seasoning and fresh basil. A tiny drizzle of olive oil is the crowning touch - in my book, about as good as it gets!
I love grilled pizza for so many reasons:
1. Because everything can be done on the grill, it doesn't heat the house on a hot day.
2. Because the crust is so thin, there is no rise period, just mix up the dough, roll it out and away you go (this is also wonderful for those who have a yeast phobia!).
2. If desired, the dough can be prepared early in the day, the crust grilled, cooled and set aside. The pizza can be topped and baked in the oven for just a few minutes right before serving.
3. The crusts can be grilled, cooled and frozen. When you want pizza, just pull one out of the freezer, top it with your favorite ingredients and in minutes you have delicious homemade pizza on a busy day.
4. The crust is thin, delicious and super crisp.
- For the pizza crust*:
- 4 cups all-purpose flour
- 1 ½ cups hot tap water
- 2 tablespoons extra virgin olive oil
- 2 teaspoons sea salt
- ½ teaspoon active dry yeast
- For the topping:
- 2 tablespoons extra virgin olive oil divided
- 8-10 ounces fresh mozzarella torn in small pieces
- 10 yellow cherry or small heirloom tomatoes sliced in half and drained on several thicknesses of paper toweling for 10 minutes
- 1 medium size red tomato seeds removed and diced in ½ inch pieces
- 1 teaspoon Italian seasoning
- 2 tablespoons pine nuts toasted**
- sea salt
- fresh basil leaves
-
For the dough, place dry ingredients in the bowl of a stand mixer with dough hook attached. Mix for about 30 seconds until well combined. Add hot water and olive oil.
-
Mix with dough hook for about 10 minutes. After several minutes dough will leave the sides of the bowl and form a ball - continue kneading for the remaining time (if dough is wet and doesn't form a ball, add just a bit more flour, a tablespoon at a time, until it does).
-
After kneading with the dough hook for 10 minutes, remove bowl from mixer and turn dough out onto a floured surface. Divide into four equal pieces and turn to coat each with flour. Cover with a clean dish towel and let rest for 10 more minutes. This rest time allows the glutens in the dough to relax which will make rolling much easier.
-
Roll each ball out into approximately a 14-15 inch circle . Dough will be very thin, almost paper thin. Don't worry if circles aren't perfectly shaped - these are rustic pizzas, they look better if they aren't perfect. Repeat rolling the other balls of dough and place each rolled circle onto an individual piece of parchment paper. (I put a piece of parchment paper on top of a large cutting board and then stack them up on top of each other, each one on it's own sheet of parchment paper. There is no rise involved with this thin-crusted pizza so you can just stack them up until ready to grill.)
-
Heat grill to medium setting. Brush or spray the grill surface with extra virgin olive oil. Pick up one piece of parchment paper with dough on top. Flip onto the grill surface, dough side down and carefully peel back parchment paper. Close the cover of the grill. Leave on the grill for 1-2 minutes checking occasionally to see how the bottom looks. You want this side to be slightly browned with nice grill marks. At this point flip the pizza over and grill the other side side for about 1-2 minute or until nice grill marks appear. Remove from grill, place on a sheet pan and repeat process for other dough circles. At this point you can either proceed with topping and baking your pizzas or you can cool crusts to room temperature and freeze for using at another time. (I like to freeze them un-wrapped, then once frozen, wrap in plastic wrap or foil.)
-
Turn grill down to medium-low heat level and place cover down while you are assembling your pizzas. I like to put my pizza stone on the grill and do the final baking on the stone but this is not necessary; you can bake right on the grill as long as your temperature is not too high.
-
To assemble pizza, brush crust with one tablespoon of the extra virgin olive oil. Top with fresh mozzarella and tomatoes. Sprinkle with Italian seasoning and sea salt
-
Return to grill. Bake on grill with cover down until cheese is melted and bottom of pizza is crisp and nicely browned. Timing with vary from grill to grill - on my grill this takes about 3-5 minutes. If your grill is hotter, it will take less time. Check pizza frequently to make sure underside is not browning too fast. When cheese is melted and bottom is nicely browned, remove from grill onto a a cutting board. Scatter with the fresh basil and a drizzle of the remaining olive oil. Wipe the drool off your mouth and serve!
-
Notes:
-
* Recipe makes 4 crusts. You can either freeze the dough in separate zippered bags with a few drops of olive oil or you can partially grill the crusts and freeze them until ready to top.
-
** I like to toast the pine nuts in a small pan on the stove top - just place in pan over medium heat with a few drops of olive oil and a pinch of sea salt - stir until starting to turn golden - watch them carefully as they will turn from golden to burned quite quickly.
-
If you're using a frozen grilled crust and want to finish off the pizza in the oven, preheat oven to 450˚ with pizza stone or sheet pan on middle rack. Remove crust from freezer, top and then bake for about 5 minutes or until the cheese is melted and crust is golden and crispy.
The Café Sucré Farine says
Suzette,
Thanks for stopping by! There is only one kneading for 10 minutes with the dough hook. Sorry that was unclear. I think I fixed it so it is easier to understand. Thanks for catching that! Feel free to email me if you have any other questions. Hope you enjoy it!
Suzette says
I've never used my KitchenAid to make dough so forgive my ignorance. In step 3 you say to knead for 10 minutes. Is that in addition to the 10 minutes from step 1 for a total of 20 minutes? I can't wait to try this!
The Café Sucré Farine says
@Balvinder UbiI will check into this, thank you!
Balvinder Ubi says
I don't know if there is something wrong from my side, I tried joining your blog two times, the window opens but it stays blank.
I am gluten free but once in few months I go eat full gluten brick oven baked margarita pizza. Now I can try myself gluten free.
The Slow Roasted Italian says
Your pizza looks amazing Chris! I am suffering from tomato envy. Its been so hot here that my roma tomatoes are as small as grape tomatoes and cherry tomatoes as big as large peas. Hmmm.... Mighty tasty though.
Tricia @ saving room for dessert says
Wow that is beautiful. The cheese looks so creamy and delicious. I haven't tried grilling a pizza, yet, but am so inspired by your wonderful lunch!
Yvonne @ StoneGable says
Absolutely scrumptious! I just love your Margherita Pizza with the heirloom tomatoes. This will def. go on my menu! You photographs are FABULOUS!!!!
Thanks for joining ON THE MENU MONDAY with this winner pizza ... and pretty tomatoes!
I am a new follower!
Jay says
sounds very healthy & interesting recipe
Tasty Appetite
Jeannie Tay says
What a beautiful piece of pizza! and I love those yellow tomatoes, so pretty! I love thin pizza too!
mia xara says
Lately, both my hubby and myself have adopted pizza Margherita as our favorite kind..Your version sounds and looks absolutely delicious!!I LOVE the dough-grilling idea! XO
Martha says
Looks wonderful! I've never tried grilling pizza but it's on my list of things to try! 🙂 That second photo looks delicious as well. Yum!! "Natures Candy Bowl"