
This post may contain affiliate links. For more information, see our privacy policy.


Imagine the delight of your family and/or guests if you woke them up one of these upcoming holiday mornings with a yeasty, cinnamon-y, heavenly fragrance.
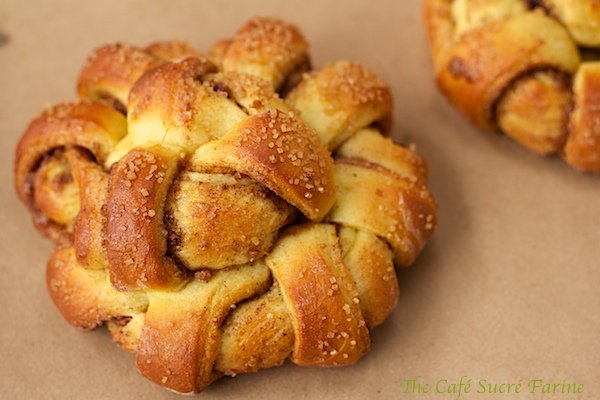
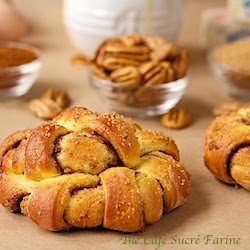
Imagine the delight of your family and/or guests if you woke them up one of these upcoming holiday mornings with a yeasty, cinnamon-y, heavenly fragrance. Of course the pièce de résistance would be when they get the first glimpse of these twirly-swirly beauties on the breakfast buffet ..................... then they'd be the ones flipping!
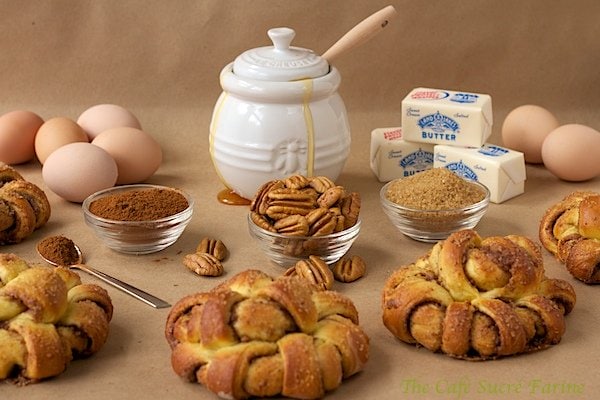
It's Thanksgiving week here in the States, a special time of the year we set aside to spend time with loved ones and to celebrate the magnitude of our blessings. For me, my faith and family are at the top of the list, but the treasure of sweet friends also ranks right up there. As I made these delicious cinnamon rolls, and added the flavorful ingredients, I was reminded of a few of these comrades ................. like Frances, who came to work one day with two bulging bags of pecans, fresh from her backyard tree!

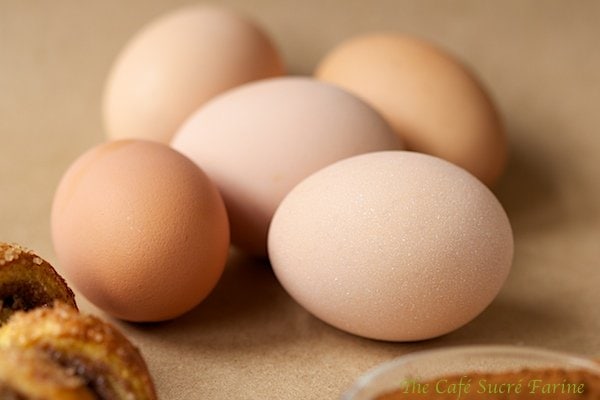
................. and Wendy, who raises chickens and delighted me a few days ago with a carton of lovely brown eggs (see how pretty they are in the pictures? I almost hated to break them open.)
I also thought of Regina who surprised me recently with a huge jar of the most delicious honey you've ever tasted ................ straight from her favorite Carolina mountain beekeeper. And do you see that darling little white honey pot? Don't you love it? It was a gift from my son and daughter-in-law ............. knowing it's from them seems to somehow make the honey taste even better!

So you see why I'm thankful for dear friends? ................ imagine how plain-Jane and boring my rolls would be without their thoughtful gifts!

One last thing; if you don't have a white (flour) thumb, don't worry; you can use this recipe and technique with frozen dough! And speaking of frozen, you can make the rolls ahead, up to the second rise and freeze them for up to 4-5 weeks. The night before the big reveal, let them thaw in the refrigerator and then ................ let the drama begin!!! 🙂

P.S.- I wish I could tell you I had a friend with a cow and he (or she) milked the cow and churned the butter for me, but I'd be a big fat liar. I do love Land O' Lakes butter though, for baking, cooking and at the table. I stock up on it whenever I see a good sale!
Ingredients:
1 tablespoon dry yeast
½ cup warm water, 105-115˚F, if you're not used to working with yeast, use a thermometer
4 large eggs
½ cup sugar
1 ½ teaspoons salt
3 ½ cups all-purpose flour, more for rolling
½ cup butter, softened
1 large egg
1 tablespoon water
1 tablespoon honey
demerara (or turnbinado) sugar, for sprinkling
Ingredients for the filling:
½ cup pecans, finely chopped (I throw them in the food processor and pulse until finely chopped)
½ cup sugar
1 tablespoon cinnamon
Instructions:
1. Dissolve yeast in warm water, then whisk in ½ cup of the flour in order to form a loose paste. Allow to rise in a warm place until the batter has risen and fallen (this usually takes about 1 hour.)
2. Add eggs, sugar, salt and remaining flour to the fallen yeast mixture. Knead the dough until it is smooth. (I use a stand mixer with a dough hook inserted.) Add a little more flour if the dough is too sticky. Add the soft butter and knead until it is fully incorporated and the dough is smooth and elastic. Cover bowl with a clean kitchen towel. Allow dough to rise in a warm place until doubled; about 1 hour (this may take longer if your kitchen is cool.)
3. Combine pecans, sugar and cinnamon. Set aside.
4. Line 2 sheet pans with parchment paper. Preheat oven to 375˚F. Cut dough into 8 or 10 equal pieces and roll into balls. Allow to rest for 10 minutes, covered with a clean kitchen towel.
5. Pat each ball into a roughly shaped rectangle and cover all but one with your towel.
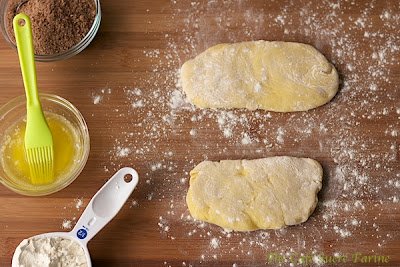
6. Roll each flattened piece of dough into a rectangle, approximately 4x10 inches. It doesn't have to be perfect.

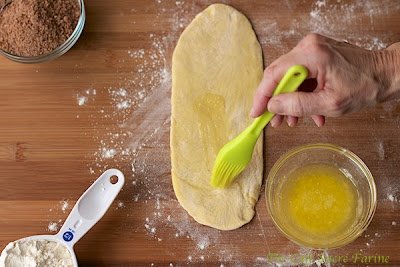
7. Brush rectangle with butter and sprinkle with 1½-2 tablespoons of the cinnamon-sugar mixture. Spread evenly with your hand then pat mixture into dough. (see picture).


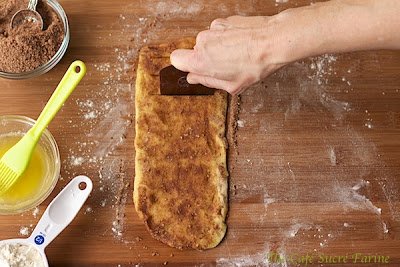
8. With a plastic scraper (I use one from Pampered Chef) or a sharp knife cut slits in dough, about ¾" apart leaving about ¼" uncut at the edges. In other words, you're not making the cuts all the way across the dough. (see picture)
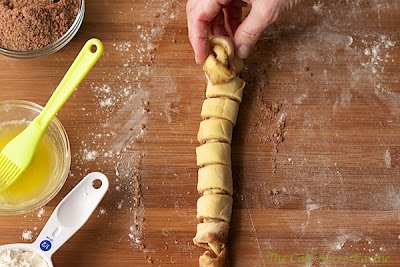
9. Starting at one long end of the piece of dough, begin rolling into a log by folding dough over about ½" (see picture)

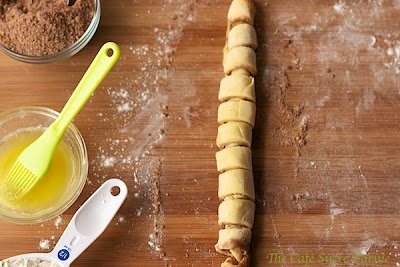
10. Continue rolling until complete with seam facing down. (see picture) Take one end and make a turn to the side. (see picture)
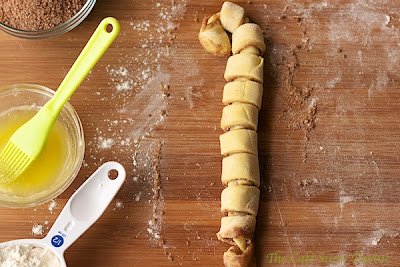
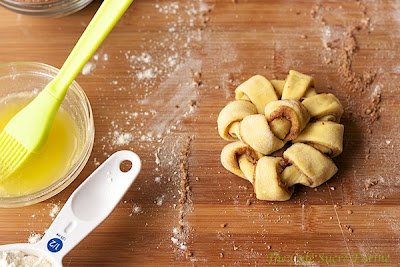
11. Pick up the turned end and continue rolling across the top of the roll. (see picture) When you get to the end, tuck it underneath. Pick up the roll with two hands and place on prepared pan, fanning out edges a bit, if needed. Repeat with remaining pieces of dough, placing on pans and leaving 2-3" in between each roll. I only put 5 rolls on each sheet pan to allow room for the rolls to rise and grow.

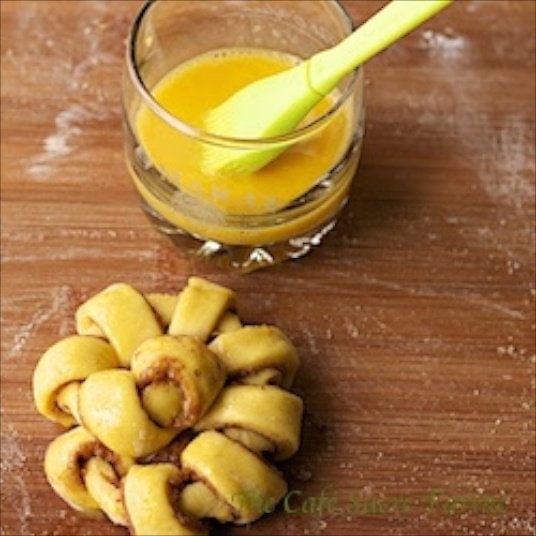
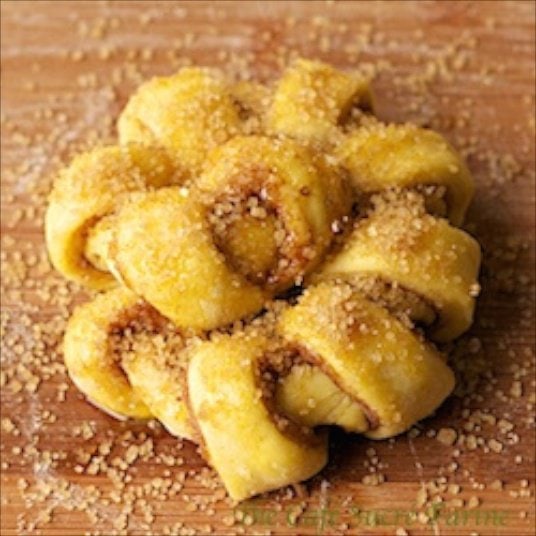
12. Allow to rise until almost doubled. Brush tops of the buns with egg wash. Sprinkle generously with the demera (or turbinado) sugar.
Rolls can be made ahead completely and frozen. Freeze on a large sheet pan until frozen, then store in a zippered bag or airtight container. To serve: thaw and rewarm in a 350˚F oven (on a sheet pan covered lightly with foil) for 5-10 minutes.
Shop Our Café Loves
We’ve gathered our favorite kitchen tools, tableware, and entertaining treasures in one place, the Café Loves store. It’s a wonderful spot to find something special for yourself or the cooks and hosts you love!


Hi Chris- I’m using SAF instant yeast. Would I need to make any changes in the beginning of the recipe? Thanks for all of the great recipes.
Debra
Seaside, Oregon
Hi Debra, instant yeast is interchangeable with regular yeast but not the other way around so you should be fine using instant yeast for this recipe.
This looks amazing! Is there a way to make this into a printable? I see it was one of your earlier recipes. 🙂
Hi Tracy, yes this was quite a long time ago. There should be a print recipe option.
Made these tonight and they taste good and look beautiful. Can I post a photo? I was a little worried because they didn't seem to be raising at first rise but they popped up at the end. I did think I would taste the pecans more but it really just tastes like cinnamon rolls. I'm not very experienced at making bread type desserts so I did have trouble rolling these out to the desired rectangle but that really didn't matter, they came out great. Took me about 3-1/2 hrs. from start to finish which I'm sure is due to my lack of experience. I would definately make these again.......as a bonus, my home smells wonderful!
Hi Margie, thanks so much for sharing your results! I'm so happy these turned out well for you. Unfortunately, Wordpress doesn't have an option to share pictures but I would love to see your rolls. You could send a picture in an email! chrisscheuer@me.com
I have just recently discovered you and all of your wonderful recipes and blog! I absolutely love your recipes and every time a new one pops up on my FB page...I want to make it!! Thank you for all that you share!! Your husband does an amazing job of photographing all of the wonderful things that you prepare!! What a team!!! Wishing you many more yummy days ahead!!
So sorry for the confusion. I changed the numbering and it was a bit confusing. It's right now. You make the rolls through step 11, then freeze and when you unthaw them, proceed with step 12 and 13. Thanks for catching that! 🙂
These look lovely. Just one question... you say that they can be made in advance up until step 10, then frozen, thawed, and backed at a later date. Do I form them and then freeze them, or roll them, freeze them, and form them once they've thawed? Should it be up until step 11 and then, once thawed, proceed to steps 12 and 13? Thank you so much!
Oh my goodness you've got the golden hands no doubt about it Chris, I cant believe these rolls, seriously I want to make them tomorrow! I love the preparation pics also, they are great! Hugs and Kisses!
Hi Chris, your cinnamon rolls look gorgeous. I love this and great to go with a cup of hot coffee.
Thanks for sharing the recipe and step by step pictures. 🙂
Excellent photography skill and the pictures are good for food magazine. 2 thumbs up for you, keep up the good work.
Have a lovely weekend.
These are one of the prettiest desserts I've ever seen. Forget about shipping me the intoxicating smell, how about a batch of the brioche?!
wow, this is one of the prettiest rolls i've seen lately! thanks for the tutorial on shaping these rolls! chris, i love your humour when you talked abt churning the butter!
Totally gorgeous, love the shape with the twirly-swirly design!
I'm a real fan of Lands of Lake butter, too - we always freeze a bunch when it's on sale. Anyway, what a great looking dish! Absolutely gorgeous, and I love the flavors. Good stuff - thanks.
Oh WOW these look amazing and I have to try these out. I can smell them from here 🙂 have a great week. Diane
This recipe is a must do!!!
And the pictures, composition is wonderful!
Chris, these are absolutely gorgeous! I absolutely love this technique and can't wait to try it out! Thanks for sharing.
I see these on G+ yesterday and gave them some love. I would love to see them on my breakfast plate now, Chris! Gorgeous and love all the photos:)
Hi Jen! When you tuck the dough underneath at the end it stays put quite well. I think the egg wash before baking also helps keep every thing in it's place. If there's a bit of the seam showing when you're finished rolling, just fan the slits out a bit which will push the seam underneath. You have to play with one or two of them and you'll get the technique, then you can re-shpae those first ones a bit. They don't all come out perfectly the same but I think that's what gives them personality! 🙂
Chris, this is so awesome! How do you secure the dough? This is a fun technique that I want to try, but not sure how to hide the seam / secure the dough? Thanks for sharing 🙂
I need to make more bread! These look and sound amazing. Love the unique shape. Simply beautiful!!!
I was going to say something about cows and butter, but the sight of those amazing rolls has removed everything else from my mind. I wish you could box up the aroma for me as well. Chris, they're absolutely stunning.
Regarding after thew New Year, absolutely, we should get together!
That is awesome, Chris. I love the photos in this post, as well, they're so vivid. I have a feeling I'd be tempted to sneak in a little chocolate inside these gorgeous rolls, too! Pinned and bookmarked!
Oh, my gosh, Chris, this is the coolest technique. Thanks for making it so doable for the rest of us (I think! LOL) with your extra photos! My family will love these beauties!
I can almost smell the cinnamon, buttery, deliciousness through the screen!
Beautiful brioche! And wonderful photos!
well, if you're in a sharing mood, let me write down my address to enjoy some of these pretty rolls until I find some quite time to make some of my own. They are so pretty Chris and the technique looks challenging but very tempting
That is a super fun technique. I love that! I could definitely get a lot from my husband if I made him these! hahahha:) PS I love the new site.
Beautiful, very fun rolls!!!
Thanks for sharing your technique, this looks like a wonderful project;-)
I have made cinnamon rolls, 'all my life' and never knew to roll them that way! Wonderful, Beautiful! And a new recipe too!!!!
Oh please can you package them up beautifully and ship them over to Aus? I'd be ever so grateful!
We usually have croissants with our Christmas Day breakfast but I'm sure some of these would be a welcome treat if I make them ahead and freeze. Yum!!!
They. Look. Amazing! I love pecan and cinnamon and bread. I know I would love these!
I would LOVE to see your pictures! You'll be surprised at how quickly you get the technique down pat. My first one or two didn't look so great but then I figured it out. You will too!
The way you present this rolls looks easy to do... but is so fancy, I wonder if I can create the same beautiful deliciousness. I will send you pictures if I do.
How pretty! I think I'm at the point where I can give these a shot. Thanks for the step by step pics and Happy Thanksgiving.
Chris you are an artist!!LOL
I thin these rolls look PERFECT and lovely!!!
Like everyone says, wow! These brioche rolls are so pretty and it looks like I'd be able to make them, too, thanks to your step-by-step instructions. I can't ever turn down a cinnamon treat. Love this. 🙂
Oh Those rolls are so cute. they look moist and fresh. I appreciate the step by step pictures too 🙂
Those are beautiful rolls. I love how you've shown how to do it too. Do you need my address for that package now? 😉
I could not imagine how you got the beautiful twirl to these buns, but after reading the how-to! How easy! Am going to make these for my guys for Thanksgiving morning...have a wonderful Thanksgiving with your family enjoying all the blessings the LORD has poured into your lives! Hugs!
Gorgeous! What a neat method. Happy Thanksgiving.
Here, we don't celebrte Thanksgiving in the way you do (altough my inlaws are coming this week-end) but we celebrate Christmas and I suspect that EVERYONE will love these on the morning of Christmas!!!!! Definitly going to try your beautiful brioches!
Very impressive Chris. You make these look easy, even for a non-baker like myself.
Happy Thanksgiving to you and your family.
Sam
Looking at those rolls, I was surprised by how fundamentally simple the technique was. Very cool!
Oh my gosh, I just love all your posts and recipes - PLEASE PLEASE PLEASE publish a cookbook! I would be your first purchase. The recipes are just so delicious, each and every one!
They are better than those from the bakery! I want one right now!
That is SUCH a great technique! I was looking at it thinking it looked SO complicated but it seems really easy. I will try this!
GORGEOUS!!!!!! I love it, you made it look easy, but I know mine won't look have as pretty as yours! By the way you have some wonderful Friends! In my group I'm the only one that cooks and garden, not far. Have a lovely week!
oh dear, chris..these brioche looks utterly fabulous...where on earth am i gonna find anything close to satisfy these craving now?!! (except to try your recipe pronto!) 🙂 thanks for sharing, absolutely love your photos - the whole lot.
This looks delicious! I love anything with cinnamon, and these are gorgeous!
Oh how great they are, which I will bake tomorrow 🙂
Fine pictures with explanation :)))
Wow Chris, your blog and bread are all gussied up for the holidays! Loving your new look and I can smell this bread in Boise!
I would love to have received a box from you! These are so beautiful and I know they are tasty! Thanks for showing how you make them!
Oohh!! I wish I had a friend with a cow too! But yes... good ole Land O Lakes will do nicely.
Now... Twirly and Swirly!! With a name like that, this recipe has to be a hit. I'm loving the ingredients, and this one has been printed and saved for our Leisurely Thanksgiving week off of school!! Happy Holidays... and lovely photos!
Wow! What beautiful rolls and technique to making them too. I love this post, what a treat to have. Thanks for sharing it with us. The photos are beautiful and all the how to ones are perfect too. You have lots of nice people around you giving you great gifts, something to be thankful for!
I am in love with these rolls, Chris! If these were in my kitchen, I know I'd eat a few too many of them :). Good friends are the best!