
This post may contain affiliate links. For more information, see our privacy policy.
A super easy technique for making fancy looking, chocolate covered Oreos, perfect for any occasion.

"They disappeared like hot-cakes!" Those were my husband's words as he set the empty plate on the counter; the plate that had been loaded with chocolate treats earlier in the day.
There had been a party at his work place and, being in a pinch for time this week (anyone else in this predicament?), I opted for something that I knew everyone would love, something that I could put together quickly yet, would look quite festive.
Most folks I know seem to have a fondness for Oreos and when you dress them up in Sunday-going-to-church clothes, they're especially irresistible. If you haven't tried this super easy technique for making fancy looking, chocolate covered Oreos, you're in for a surprise - a wonderful surprise. The sky's really the limit as far as the myriad of ways you can decorate them. Let your imagination go as crazy, creative, zany, classy, pretty, elegant or fun as it wants!
There's only one piece of (very inexpensive) equipment necessary for these delightful treats; you'll need what's called a cookie mold. The mold is available online, at craft stores like Michael's or ACMoore and at kitchen specialty shops. They can be used over and over and clean up easily with soap and water.
Do you have a special event coming up that you need a delicious, but simple treat for? A holiday party or work celebration? Do you need small fun gifts for co-workers, neighbors, friends, teachers, mailmen, etc.? Give this super-easy technique with super-spectacular results a try. I think you'll find, like my husband did, that, "They'll disappear like hotcakes"!
P.S. I used almond bark for my Chocolate Covered Oreos. It's easy to work with and there's none of the usual complications you can have with dipping chocolate (tempering, seizing, etc.). I, personally prefer the taste of real chocolate to the almond bark, but when you're short on time, this works great and besides, everyone seems to love them!
Scroll Down for the Recipe - or Save It to Your Inbox
We’ll email you the recipe so it’s easy to save, print, or share.
Chocolate Covered Oreos, a Quick, Easy & Fun Treat
Ingredients
- milk chocolate and/or white almond bark
- Oreo sandwich cookies, (I thinkt the Double Stuff variety works the best.)
- decorative jimmies, sprinkles,
- crushed peppermint candies or candy canes
- Equipment needed: Oreo or cookie molds - I like having at least two molds, six cookies in each mold in order to make the process quicker.
Instructions
- Set cookie molds and Oreo cookies out on a clean work surface. Cut a sheet of waxed paper or parchment paper and lay on the work surface.
- Place almond bark in a microwave-safe bowl. Heat at 50% power for 1 minute. Remove from microwave and stir well. Microwave for 15 seconds longer at 50% power, then remove and stir. Repeat for 15 second intervals in the microwave and stirring until mixture is completely melted and smooth. (Instead of microwaving, you can also place almond bark in a double boiler over slightly simmering water, stirring frequently till smooth.)
- Place a tablespoonful of the melted almond bark into the mold cavities, filling them about ⅓ full. Tap the mold on the table or kitchen counter to settle the chocolate, and remove any small air bubbles. Press one Oreo into each opening and center it both horizontally and vertically. The chocolate will rise up around the sides and only the top will be uncovered.
- Add a smaller spoonful of the melted almond bark on top of each cookie, filling the mold and covering the cookies. Again tap the mold lightly on the work surface to remove air bubbles.
- Scrape the excess chocolate off the mold with a flat edged spatula or a bench scraper.
- Refrigerate the molds for 10-15 minutes. Remove from refrigerator and gently press on the back of the molds to release the cookies.
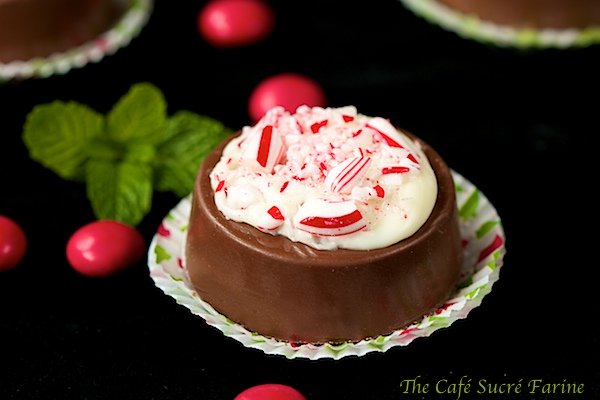
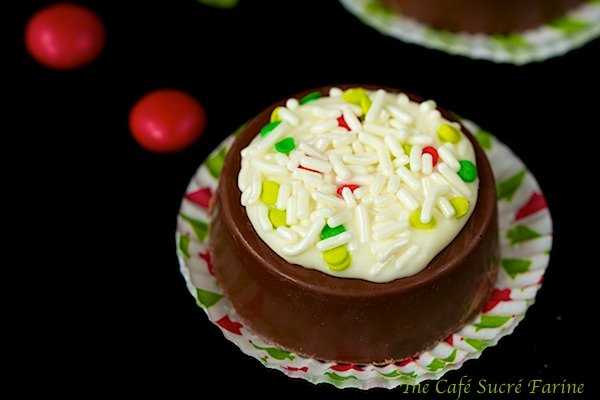
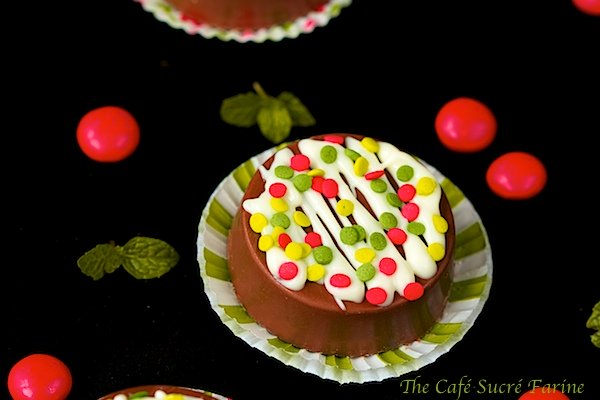
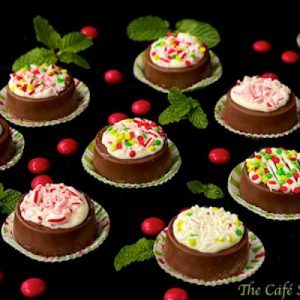
- Place cookies on prepared wax paper and decorate as desired. I drizzle them with a bit more almond bark in contrasting color, then sprinkle with jimmies, sprinkles, crushed candy canes, etc.
Shop Our Café Loves
We’ve gathered our favorite kitchen tools, tableware, and entertaining treasures in one place, the Café Loves store. It’s a wonderful spot to find something special for yourself or the cooks and hosts you love!


I would love to see a picture of your molds, I have looked all over Raleigh and can not find "cookie molds". Thanks!
I would love to see a picture of your molds, I have looked all over Raleigh and can not find silicone "cookie molds". Thanks!!!
Hi Malinda, I think I got mine at Michaels. You can get them on line. This is what they look like: http://goo.gl/UWVNCo but honestly, you are welcome to borrow mine. I won't be using them before Christmas and I live in North Raleigh. Just shoot me an email and I can give you my address. cscheuer1@gmail.com
Just an FYI ... I bought the Wilson brand molds that were sold at my craft store near the melting chocolates. They are too shallow to properly fit a double stuff cookie, had to use the regular in order to level them off at the tops. Saw online that a lot of other brands do fit a double stuff, but in my experience, the Wilson brand did not! ...Now I have a whole family sized bag of double stuff that did not work that I'll have to eat so it doesn't go to waste! ; )
Oh, thanks for the heads up, I think my mold is made by a different company but this is good to know. Sorry about that Oreo problem, I wish I had it! 🙂
sounds fun to make and even fun to eat..surprise inside!! little gorgeous treats, i'm sure no one can stop at just one!
What a fun treat and so pretty for the holidays! Very cleaver! Enjoy your time with your family from London - how special!!
I'm afraid to even have oreos in the house - I am tempted. With milk. Split apart. However, this is a fast fix for a fabulous treat. I think I may do this and take them to the physical trainers at my athletic club. Bet them eat them. Bet they eat them. Bet they eat them. Thanks for the ideas and the display of many different toppings.
Your chocolate covered Oreos look so fun dressed in their Sunday best, you crack me up;-)
Aw shucks, where the picture of one cut in half? These are so pretty, only you Chris could make oreos so gorgeous! Oreo makeovers by Chris! lol! Love it, and so handy for when you need a quick treat for your party!
This is so much fun! A little whimsy for the holiday season + a little Oreo surprise inside. I like...
We always have to have Double Stuff in the pantry! What a fun way to make a favorite cookie into a festive treat! So darn pretty!!!
Always a favorite of mine!
These are so festive. It looks like you had fun, Chris.
Fondly,
Glenda
This is a great idea Chris, oreos in chocolate! I've never heard of almond bark, not sure if the bakery supply shops here sell them...i might just need to use cooking chocolate? Now to hunt for those cookie moulds.
These are so pretty, Chris! They'd make lovely place settings!
I used to have a candy store and sold chocolate covered Oreos...they were very popular. Yours are much cuter cuter than what I sold.
Just wanted to let you know I made your crackly pecan ginger cookies this morning. They sure beat my old stand by ginger cookies which are a hit with my family. These are wonderful; thank you so much!
Those are beautiful! Who would ever guess that there's a dunk-in-milk kid's cookie in the middle.
They look delicious & pretty!
What a great idea! So pretty, yet so simple to make too. I bet they did go over well at the party. Great for all ages too 🙂
They look so fancy! No wonder they disappeared so quickly. Off to buy myself a cookie mould!
What a fun post! Adorable little bites...I have never seen cookie molds..guess I had better spend some time in Michael's.
What a fantastic idea! They look divine!!
Look georgeus!
These are one of my favorite dessert table treats. I love how quickly they come together and how economical they are. Now only if I can get mine to come out as perfect as yours!
Reallu expensive, indeed!!!! I'm sure I could prepare these in my sillicone muffins molds! I know everyone will love these!!!!
I bet the co-workers just wait for your husband to show up.
Really creative photography. Good job.
Oh boy these would be a hit with anyone! Who doesn't love Oreo's and chocolate togethe? I love your presentation of them!!